测试开发技术网站
博客
设计
设计
开发
Python
测试
unittest
运维
Linux基础应用
CI/CD
CI/CD
数据库
数据库
云计算
云计算
云原生
云原生
爬虫
爬虫
数据分析
数据分析
人工智能
人工智能
登录
注册
VMWare 虚拟机如何通过新增挂载点的方式扩展磁盘空间
收藏本文
作者:redrose2100 类别: 日期:2022-11-07 03:28:26 阅读:1325 次 消耗积分:0 分
[【原文链接】VMWare 虚拟机如何通过新增挂载点的方式扩展磁盘空间](http://devops-dev.com/article/430) (1)首先将虚拟机关闭,然后选中虚拟机,点击【编辑虚拟机设置】 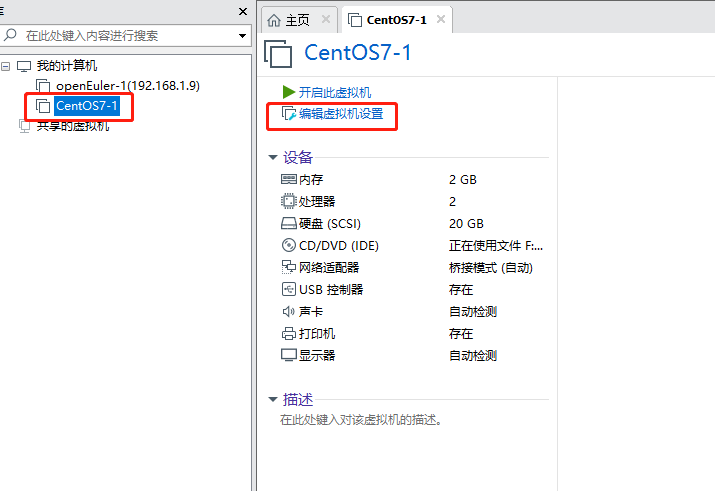 (2)然后选中磁盘,点击【扩展】 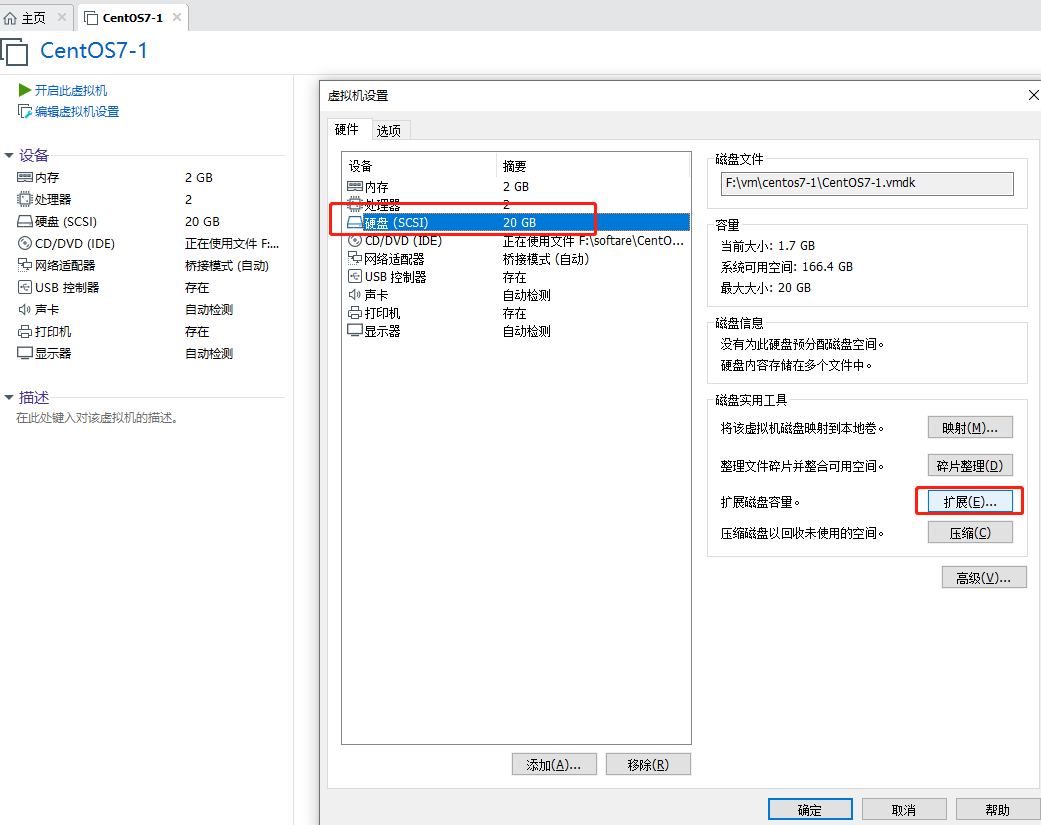 (3)比如扩展到30G,点击【扩展】 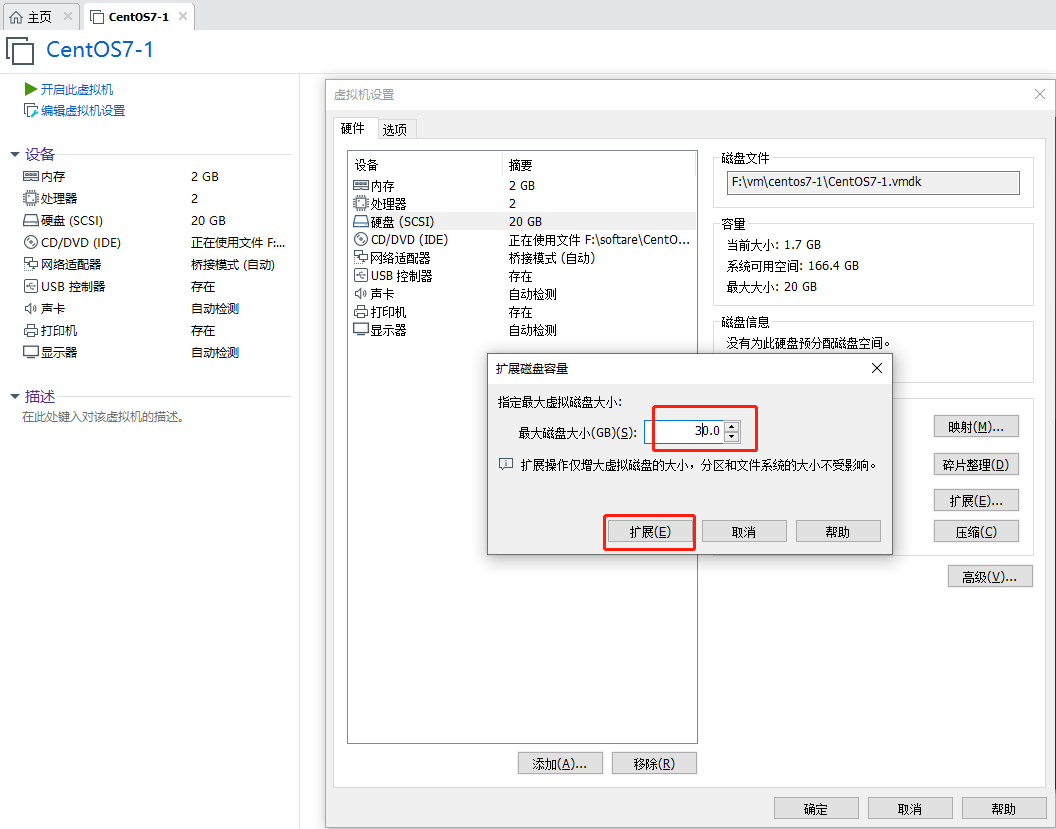 (4)出现如下提示,然后点击【确定】 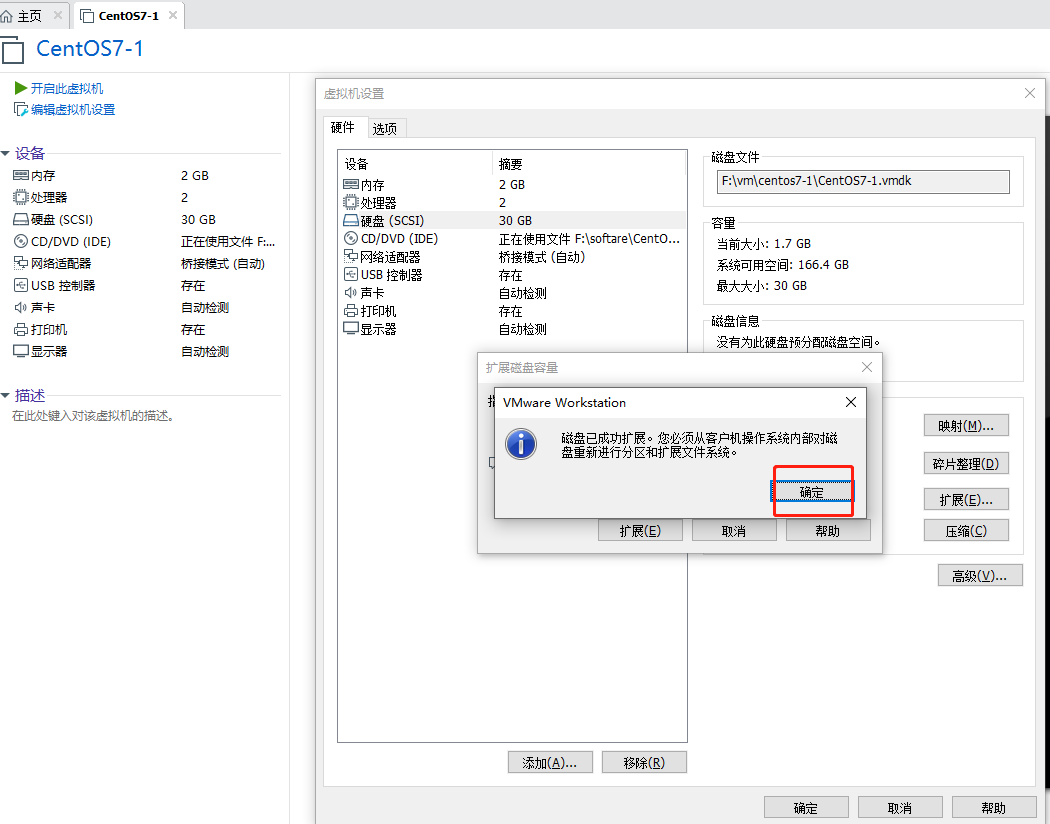 (5)点击【确定】 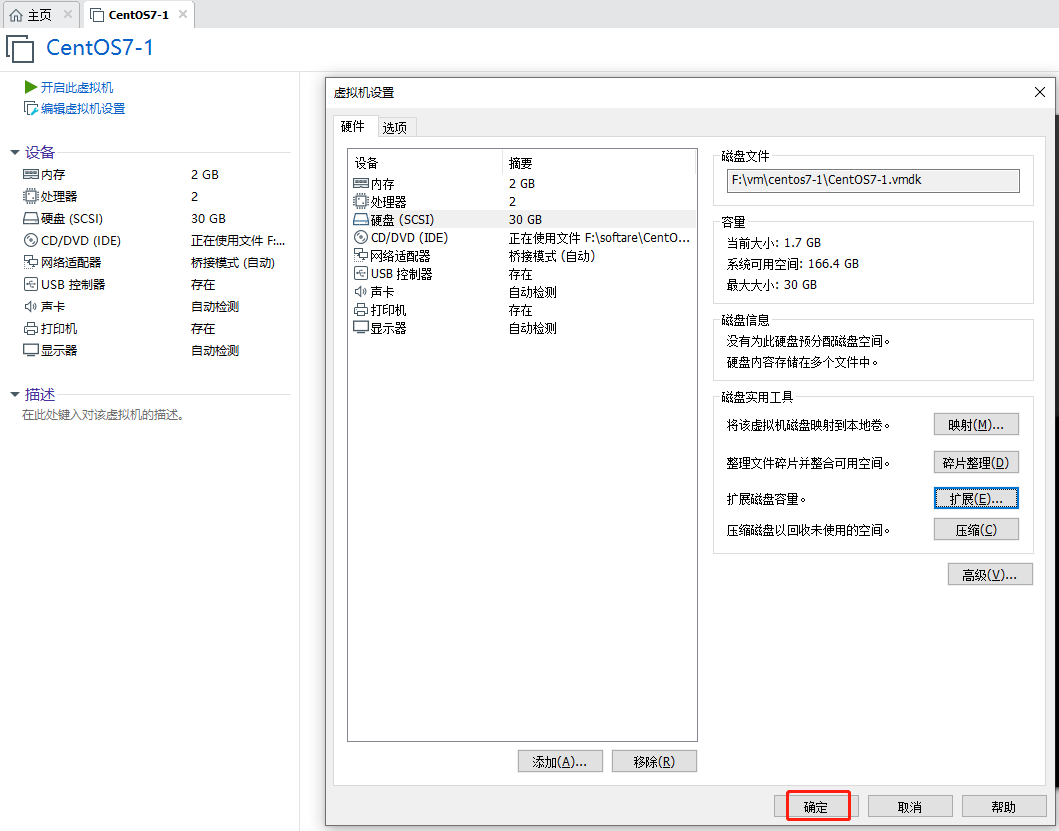 (6)然后启动虚拟机  (7)登录虚拟机后使用如下命令查看磁盘 ```bash fdisk -l ``` 结果如下:  (8)然后参照如下命令创建分区,具体输入在如下的注释中详细说明 ```bash [root@centos7-1 ~]# fdisk /dev/sda 欢迎使用 fdisk (util-linux 2.23.2)。 更改将停留在内存中,直到您决定将更改写入磁盘。 使用写入命令前请三思。 命令(输入 m 获取帮助):m # 输入m查看帮助命令 命令操作 a toggle a bootable flag b edit bsd disklabel c toggle the dos compatibility flag d delete a partition g create a new empty GPT partition table G create an IRIX (SGI) partition table l list known partition types m print this menu n add a new partition o create a new empty DOS partition table p print the partition table q quit without saving changes s create a new empty Sun disklabel t change a partition s system id u change display/entry units v verify the partition table w write table to disk and exit x extra functionality (experts only) 命令(输入 m 获取帮助):n # 输入n创建新的分区 Partition type: p primary (2 primary, 0 extended, 2 free) e extended Select (default p): p # 输入p,即primary类型 分区号 (3,4,默认 3):3 # 根据提示输入3,因为已经有1,2了 起始 扇区 (41943040-62914559,默认为 41943040): # 输入回车,保持默认即可 将使用默认值 41943040 Last 扇区, +扇区 or +size{K,M,G} (41943040-62914559,默认为 62914559): # 输入回车,保持默认即可 将使用默认值 62914559 分区 3 已设置为 Linux 类型,大小设为 10 GiB 命令(输入 m 获取帮助):w # 输入w,保存并退出 The partition table has been altered! Calling ioctl() to re-read partition table. WARNING: Re-reading the partition table failed with error 16: 设备或资源忙. The kernel still uses the old table. The new table will be used at the next reboot or after you run partprobe(8) or kpartx(8) 正在同步磁盘。 [root@centos7-1 ~]# ``` (9)此时再次查看分区情况 ```bash fdisk -l ``` 结果如下,可以看出此时 /dev/sda3 分区已经存在了  (10)重启虚拟机 ```bash reboot ``` (11)将磁盘分区初始化为物理卷,以便被LVM使用 ```bash pvcreate /dev/sda3 ``` 执行结果如下:  (12)执行如下命令查看逻辑卷 ```bash lvs ``` 执行结果如下,这是已经存在的逻辑卷,逻辑卷组为centos  (13)在新建逻辑卷之前首先新建一个逻辑卷组 比如这里新建一个名为centos-2的逻辑卷组 ```bash vgcreate centos-2 /dev/sda3 ``` 执行结果如下:  (14)新建逻辑卷 如下,-L指定大小,-n为指定卷的名称,比如这里已经存在root名的卷了,而扩展的目前也是想挂在根目录的挂载点上,因此可以起个名字比如root2,名字可以自己定义,最后需要指定逻辑卷组centos-2 ```bash lvcreate -L 10G -n root2 centos-2 ``` 执行结果如下,这里显然创建失败了,提示原因是空间大小超出了2559  因此可以修改一下大小,比如修改为9.75G,如下 ```bash lvcreate -L 9.75G -n root2 centos-2 ``` 执行结果如下,可以看出,此时创建成功了  (15)再次查看逻辑卷 ```bash lvs ``` 执行结果如下,可以看到逻辑卷root2此时已经创建成功了  (16)格式化逻辑卷 ```bash mkfs -t ext3 /dev/centos-2/root2 ``` 执行结果如下  (17)新建挂载点 /data ,然后将逻辑卷挂载到 /data ```bash mkdir /data mount -t ext3 /dev/centos-2/root2 /data ``` (18)然后通过 df -h 即可查看到新增的磁盘分区了 
始终坚持开源开放共享精神,同时感谢您的充电鼓励和支持!
版权所有,转载本站文章请注明出处:redrose2100, http://blog.redrose2100.com/article/430
上一篇:
Kubernets简介
下一篇:
Linux----扩展磁盘空间到根目录
搜索
个人成就
出版书籍
《Pytest企业级应用实战》
测试开发技术全栈公众号
测试开发技术全栈公众号
DevOps技术交流微信群
加微信邀请进群
常用网站链接
开源软件洞察
云原生技术栈全景图
Python语言官方文档
Golang官方文档
Docker官方文档
Jenkins中文用户手册
Scrapy官方文档
VUE官方文档
Harbor官方文档
openQA官方文档
云原生开源社区
开源中国
Kubernetes中文文档
Markdown语法官方教程
Kubernetes中文社区
Kubersphere官方文档
BootStrap中文网站
JavaScript中文网
NumPy官方文档
Pandas官方文档
GitLink确实开源网站
数据库排名网站
编程语言排名网站
SEO综合查询网站
数学加减法练习自动生成网站
Kickstart Generator
文章分类
最新文章
最多阅读
特别推荐
×
Close
登录
注册
找回密码
登录邮箱:
登录密码:
图片验证码:
注册邮箱:
注册密码:
邮箱验证码:
发送邮件
注册邮箱:
新的密码:
邮箱验证码:
发送邮件